I just came from the mountains where I was using my Snow Peak Alpha Breeze tent, so here is my report about its performance. I must say I am very impressed with this tent.
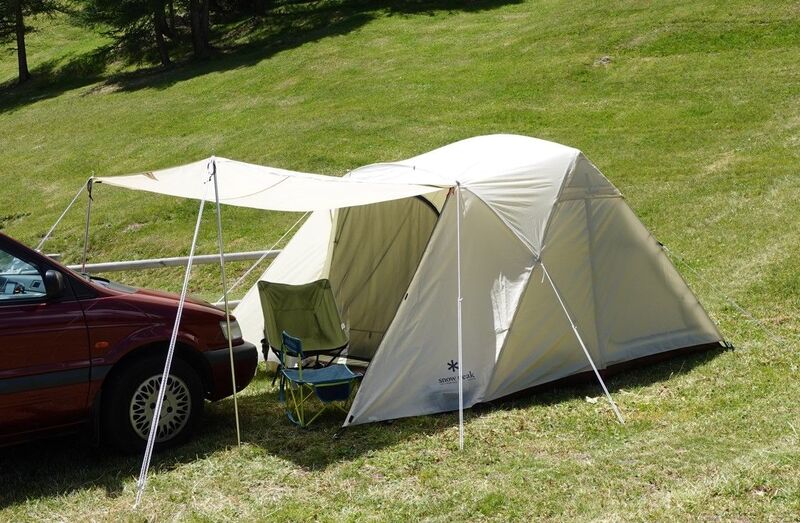
Key features & benefits
- Unique design.
- Full coverage fly.
- 2 Vestibules.
- True double-layer tent.
- 4 Doors.
- Awning (poles included).
- Very reliable.
- Excellent ventilation.
So, what this is about
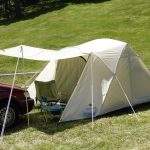
Here you have the ivory version of the Snow Peak Alpha Breeze tent. From what I know they initially launched this only for the US market. The brown version of the tent has been on the market for some time already. However, from what I see around, only the ivory version is available at various sellers.
This is a tent with a completely unique design, but it is appropriate to say that this is not unusual for this brand. What I mean by that is the fact that you cannot put it in any of those basic groups.
Namely, the frame is such that the sides of the tent are almost completely vertical. This is because of the A-shaped side poles that are connected with a ridge pole. See one of them in the picture:
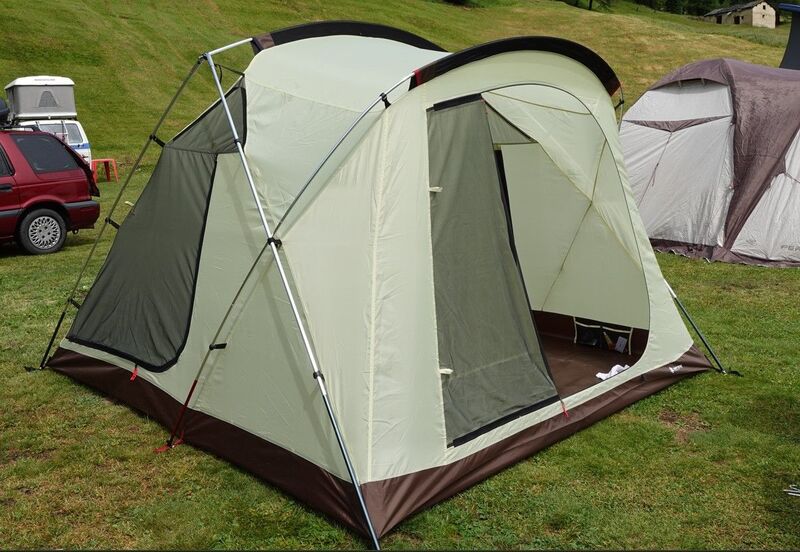
But the other two sides are angled, the picture below shows the rear side of the tent. On the other hand, when it is under its massive full-coverage fly that creates two vestibules, it may look like a dome-shaped tent. However, this is not so.
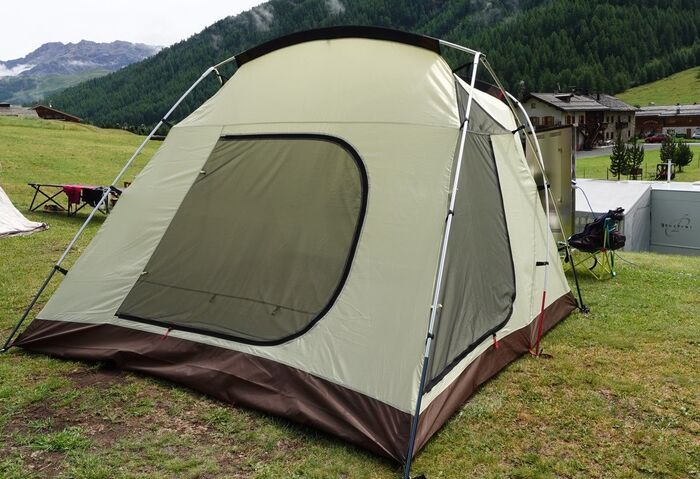
The tent is also a true double-layer type. This means you have an inner canopy that is all taffeta (shown in the picture above) plus the fly.
The doors
The doors are one of the best features of this tent. There are four of them, and all of them are very large. I would not say that you really need them so many, but they have their purpose regarding ventilation, more below.
All the doors on the inner tent are matched with the corresponding doors on the fly. The doors on the sides are symmetric, the same size and with the central zipper on the fly.
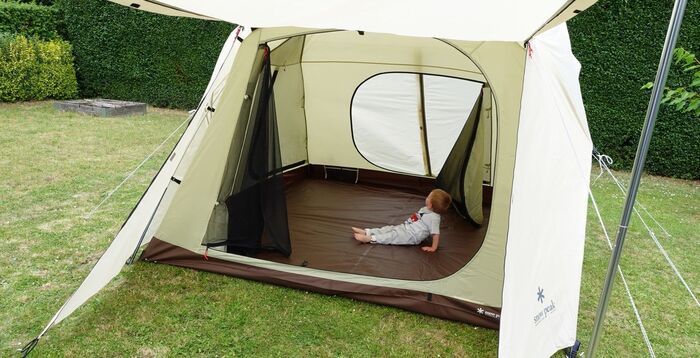
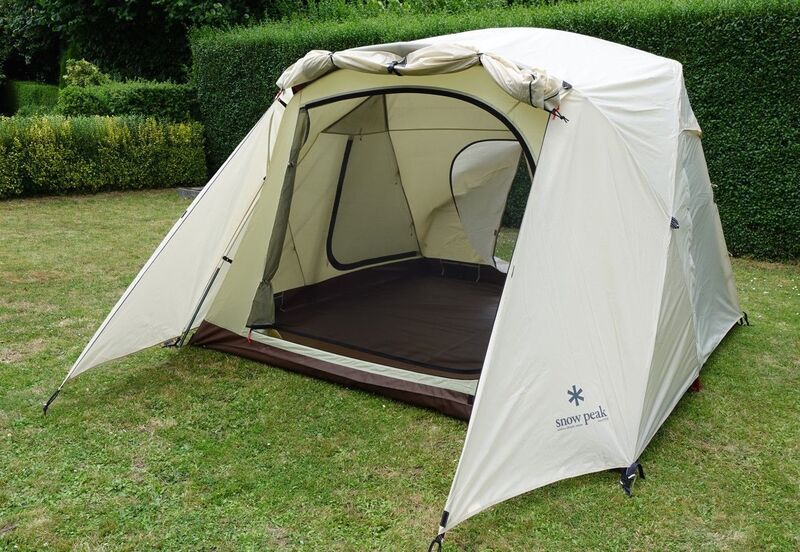
But the main front door is the largest, and it leads to the front vestibule where you have two zippers. This means you can unzip the flap and roll it and fix above the door as shown in the picture below. This was from my initial testing at home, and this is when my grandson was around to inspect the tent as you have seen above.
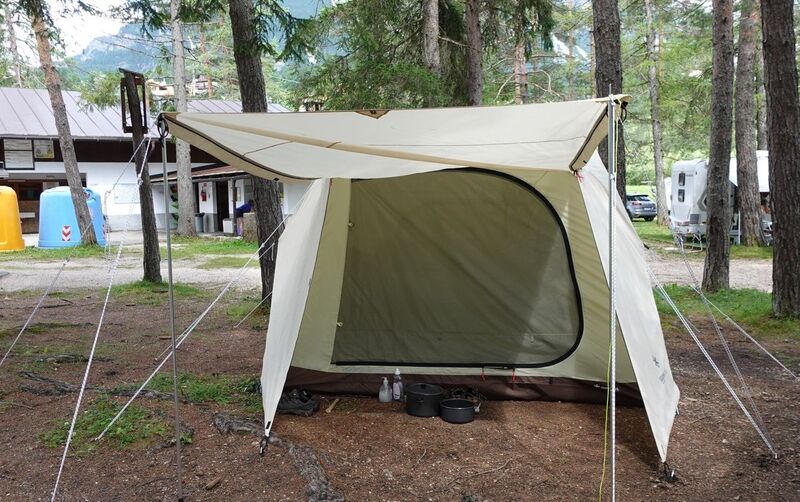
You can also create a large awning with it, the picture below is from my camp in the Dolomites. There are two poles included in the package for this purpose, plus the corresponding two guylines that are longer that the rest. Observe how large the main door is.
Materials
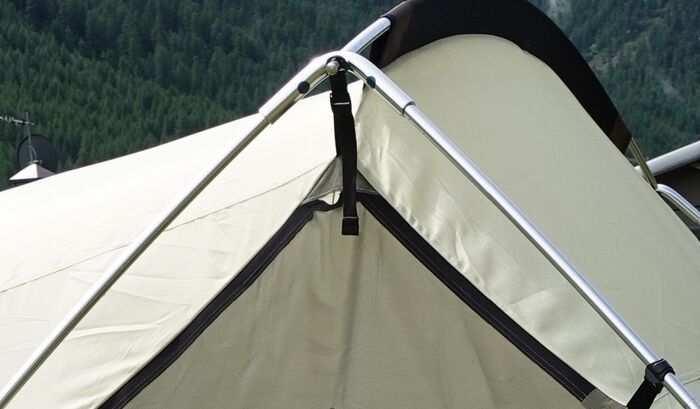
The poles: There are four separate shock-corded and thick duralumin poles that support the tent. They include two mentioned A-shaped side poles, one ridge pole that connects these two (see it below), and one much longer pole that supports the front part of the tent and crosses the side poles at two places and then attaches at the base of the tent on the sides.
The poles attach to the base of the tent with a sort of a pin-and-ring system, but this is again a completely unique design. Higher on the canopy you have a combination of many clips, loops with Velcro, and sleeves.
Note that the ridge pole goes through the holes in the elbow elements of those A-shaped side poles, see the picture. So the overall structure is very strong.
The fabric: From their specifications it follows that the fly is a 75D polyester taffeta with a PU coating that gives it 1800 mm waterproof rating. It is with a Teflon water repellent and with a UV cut processing.
The inner tent is a 68D polyester taffeta, and its bottom is a much more durable 300D polyester Oxford with a PU coating and a 5000 mm rating. The bottom is a bathtub type, this is the brown material that you can see in the pictures.
All zippers are YKK, so you can hardly find something better. Note that they provide a manual for this Snow Peak Alpha Breeze Tent.
I used computer in the tent, and I needed external power. I realized it did not have a cable port, this is a minor detail, I passed the cable through one of the doors.
Note that the material color is such that there may be too much light inside if the tent is not in a shade. I used computer inside, and could not read the screen in the Livigno camp. In the Dolomites, I was under the trees and this was much better.
Ventilation
I mentioned the doors, so here to stress that all of them are two-layer type. This means they have a full size zippered mesh, plus a full size zippered panel. Being under the fly, you can keep them with mesh only if you wish. This will create lots of air flow in all four directions.
But the inner tent also has two triangular high vents, they are with a fixed mesh plus a zippered panel. So you can open them as you wish, and this will create vertical air flow.
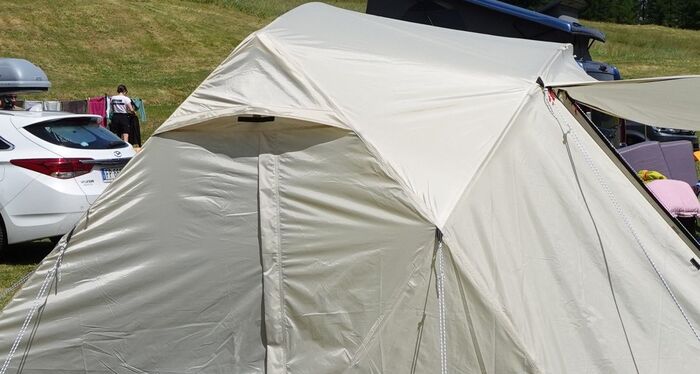
Note that the fly itself has two vents that match those vents on the inner tent, see one in the picture below. There are stiffeners in place so you can easily open them and keep in that state all the time.
Wait, there is more. The front and rear doors are both designed so that you can roll their inner panel for some 20 centimeters or so from the ground, and then fix with toggles and loops that are in place. You will see this in the video below. With this, you can create two long low vents if you do not want to keep these two doors with mesh only.
Note also that the zippers on the vestibules are two-way type so you can unzip them from upper side as well and create extra venting options while still keeping the vestibules mainly closed.
All in all, ventilation here is at its best, and this in spite of the fact that the tent is formally without mesh on the canopy. There is nothing at all to object here.
Setting the tent up
One person can have this tent ready in 20 minutes or so in total. Setting the inner tent is really easy and very intuitive. But when you have to put the fly on, it is much easier if you have somebody to help.
Attaching the fly as a single person can be a bit tricky because the tent is tall and large. But I did manage to do this on my own when I was trying the tent at home, and also in Livigno. Later in Cortina d’Ampezzo camping, somebody offered help so this was done in seconds.
However, the fly is huge, and there are four doors, and it is very easy to get confused. So the trick is to start with the front side of the fly. Position it so that the inscription Snow Peak goes to the right (see the pictures), and then clip the fly on the two front points. Then have somebody to pull it over the tent, the rest is very easy.
If there is nobody around, it is best to attach the fly before you put all poles in place. I did this in my camp in Livigno.
Without the fly, the tent is fully freestanding. This is convenient when you have to move the tent in the camp or to rotate it.
This is what I did in Livigno. I had a bad Internet connection, and I moved the tent a bit closer to the central area. There was a man from England and his wife who offered help, so we simply carried it to the different position together with the fly on. All I did before that was to remove the stakes.
In this video you can see more, please have a look:
Who is it for
Regarding the area, at some places the tent is described as officially for 3-5 people. At the Snow Peak site they write about 4. The dimensions are such that you can indeed put up to 5 pads on the floor. On the other hand, it has two vestibules for storage. You can use the rear vestibule for boots and similar stuff and not use as an entry point.
This is why I have included it in my list of best 4-person tents. But in reality, you would want more space, so it is best to downgrade this number. The tent is perfect for couples.
I was using it as a solo car-camping tent, and I was still able to make a mess inside and fill it with my mountaineering stuff, plus a small table and a chair inside which I used for computer and for dining.
Regarding seasons & climate, with such two layers, you might think the tent is primarily for a cooler climate. I myself was using it in the mountains, and this was in summer. But during the night the temperatures were sometimes close to zero degrees Celsius. So I kept the tent completely closed during the night.
On the other hand, during the day, the temperature was a few times close to 30 degrees C, and I was sometimes resting during the day. With the doors with mesh only, it was never really too hot inside.
The tent is fully covered with its fly, the waterproof rating is very good. In one occasion, in the Livigno area in the Italian Alps, I had rain all the night, real thunderstorm with lightning etc., and it lasted for around 11 hours in total, with some interruptions. So how was it inside? Well, I have never seen any drop of water anywhere.
I later moved to the Dolomites, and the weather was very unstable, with lots of rain. But never any leak inside.
Regarding winds, cannot say much. It was indeed windy in some situations and the tent worked great. The fly creates a far more aerodynamic structure that what you would expect when you see its vertical side walls.
The simple J-shaped stakes are surprisingly strong in spite of their shape. But this same shape is not great, sometimes the ground is such that you cannot force them in completely, and then they may rotate and the guylines get off. So, in my view they should have provided better stakes with such a quality and expensive tent.
Regarding the weight, the official numbers are below, I did not weigh the tent myself. This is a car camping item so the weight is not a big deal in any case.
The packed size is more important, and the tent is indeed bulky. But you have seen it, this is a double layer structure, and the large doors themselves have two layers. The poles are also very think, and there are those two extra included for the awning. So the weight and bulk are indeed justified.
Regarding the price, the tent is expensive, but this is a high-quality product, and it is worth the investment.
Specifications
- Weight: 24.2 lb (11 kg).
- Official capacity: 4 people.
- Dimensions: 14.9 x 8.1 ft (454 x 247 cm).
- Inner area: 77.17 ft² (7.17 m²).
- Inner area per person: 19.4 ft² (1.8 m²).
- Vestibules area: around 33 ft² (2.7 + 0.4 m²).
- Peak height: 73 in (185 cm).
- Packed size: 25.2 x 10.6 x 9 in (64 x 27 x 23 cm).
Final thoughts, rating, pros & cons
To conclude this Snow Peak Alpha Breeze Tent review, what you have here is a very reliable tent, and its craftsmanship is at a very high level.
The tent is functional, and I have no doubt it will protect you in all seasons and weather conditions. I have tested it in several situations with heavy rains, and it remained dry inside all the time. Fully recommended. I have included it in my list of tents with a full coverage fly and in best Snow Peak camping tents.
Below you can see how this tent stands against my standard rating criteria that I apply consistently to all of them here in the site so that you can easily compare:
While the tent boasts exceptional protection and ventilation, it’s important to acknowledge its bulkiness and relatively higher cost. The absence of a cable port is a minor inconvenience, and the basic J-shaped stakes could be improved for better stability.
BEST PLACEs TO BUY:
For more tents of this shape please check in the category Tents for 4 People.
Thank you for taking the time to read this detailed review. If you have any questions or need further information, please feel free to use the comment section below. Remember to bookmark this site for future updates, as I regularly add new content to keep you informed.
From my research it appears the mesh is quite wide and not great for keeping small bugs/midges out. Can you comment on that?
Yes I can comment on this. I just returned from the mountains where I stayed 52 days, and I used this tent when I was in official campsites. I do not remember seeing anything of that kind inside.